making paper
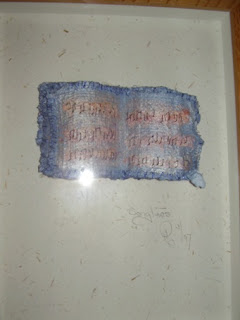
 I have an exhibition coming up in April that involves my book pictures .........shown here...........little books of music - sometimes haiku - sometimes poetry - sometimes secrets ......... always stitched.
So for this exhibition I have to make paper and thought it would good to share my method (very simple) with you !
Papermaking , my way, is simple it needs no specialist equipment and is quick
Firstly you will need some shredded computer paper - this is easily obtainable from local offices who are often glad to see the back of a bag of it ;-)
Computer paper makes good paper because of its long fibres and it also ends up white (ish) so is good for dyeng and painting.
Because it is good paper it need soaking before using - I usually soak mine overnight but a few hours will do. It needs to be soft and squidgy.
You dont need masses if you are just experimenting - a few good handfuls of shreddings in a bucket will make a good quantity to play with.
After it has soaked take small handfull and whizz it up in a food processor with some water. Here is mine - I bought it at a car boot sale, cheap, especially for papermaking.


After its been whizzed for a couple of minutes empty the contents , now paper pulp, into a container of water - a washing up bowl or plastic box are both great for this.
Pulp about half the bucket of shreddings - the wate and paper pulp should be about the consistency of sludgy water.
Cut out strips of fabric for backings - I use loose weave scrim, linen or sacking and I vary them according the size of book to be made ............mostly I work about 9cms X 17 cms. have these cut out ready.
Also have ready at the side of the sludge tank some newspapers (plenty to soak up the water) and lay one J cloth over the newspaper - the hand made paper peels off nicely from J-cloths.
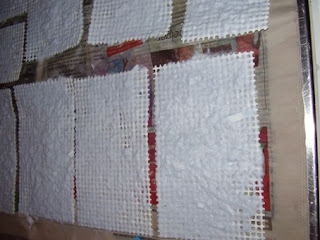
Using one strip of backing material dip it into the sludge tank and lift it out with some paper pulp on the top. It doesnt have to be even - the more uneven the better!!!
It is wet (very wet) and sludgy! Lift it out and place it on top of the J-cloth - proceed until the J-cloth is full with pieces.
Leave them to dry a lttle while - at least until they have stopped dripping! Once they have done that you can lift them carefully off the J-Cloth and dry them over a heater for speed (I am very impatient! )
I dry mine over the radiators in the bathroom ,
sitting room................anywhere :0)
When dry you will have alovely pile of hand made paper sheets to do what you want to with ..............
you can stitch them , dye them,glue them , mould them (when slightly damp) ................anything.
Oh - and one important point - it is not reccommended to pour away the sludge paper pulp down the sink cos it blocks it!
Instead sieve the pulp through an old pair of tights and squeeze out the water - it can be reconstitutes as paper pulpagain by adding water............. or if you want you can leave it to dry completely and make paper stones!


Labels: hand made books, paper making


10 Comments:
OOOOOO thank you for the tutorial---i'll be "adding" that to my fabric paper experiments!
o my goodness so much busyness! An all lovelyness too. Your paper books sound very special, but the mouses... oh the mouses - they remind me of the mice in the tailor of gloucester all gathered round a cotton reel stitching the waistcoat.
Ooh how spooky, I have a bucket of paper soaking at this very moment, love the way you make yours on the scrim.
Brilliant tutorial, Sara!
What a wonderful tutorial. I love your blog, it is such an inspiration! I have always wanted to try making paper but was put off by how complicated it looked in papermaking books. "You have bought it to the people" - good for you!
This is a great tutorial!! Thanks so much.
I have made paper before now, but have never backed it with anything, so I think this is a brilliant idea .Thanks Sara. I must find the liquidiser I used. Now where did I put it!
thank you so much for this tutorial. i always made paper of bought cotton pulp but this method is so straightforward and easy i must try it too!!
Thanks for the know how. I am planing on making a small book for my beloved and I wanted to use this type of paper. Any idea if it can be run through a computer printer?
Really good tutorial, Zaz! I've made my own paper now! Here's another post I came across while researching handmade paper. It came in handy with its step-by-step photos and descriptions: How to Make Handmade Paper
Post a Comment
<< Home